 View on GitHub
 VouchrSDK Reference
Integrating the SDK
CocoaPods
Add the SDK to your project via CocoaPods by adding the following line to your Podfile.
pod 'VouchrSDK'Navigate to your project directory in Terminal and run:
pod install
Note: Your Xcode project must be opened using the .xcworkspace file, not the .xcodeproj file.
Manual
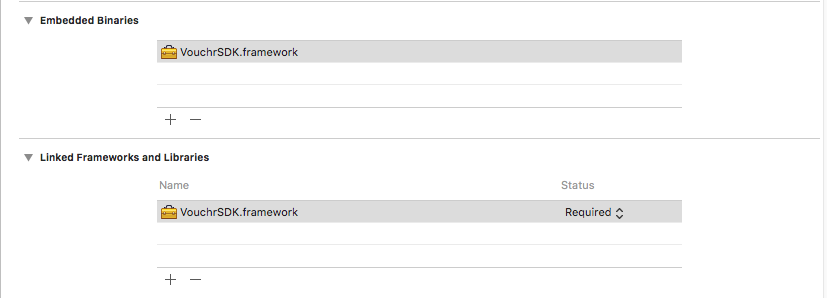
Download the VouchrSDK Framework from GitHub
Add the Framework to your project’s Frameworks and add it as an Embedded Binary
If using Swift, create (if not already created) a bridging header and include
#import "VouchrSDK/VouchrSDK.h"
If using Objective-C, import the framework where you need to use it:
#import <VouchrSDK/VouchrSDK.h>
Setup and Starting the Creation Flow
Create / Setup a
VouchrConfigwith your values. You can alternatively use a plist file to provide values. SeeVouchrConfigfor details.self.vouchrConfig = [VouchrConfig config]; self.vouchrConfig.serverUrl = @"api.vouchrsdk.com"; self.vouchrConfig.sdkString = @"SDK_STRING";Instantiate a
VouchrEnginewith your preferred dependencies and theVouchrConfigyou created.VouchrEngine *vouchrEngineSDK = [VouchrEngine vouchrEngineWithConfig:vouchrConfig builder:^(VouchrEngineBuilder *builder) { // override any default managers here // eg. builder.networkManager = [YourNetworkManager new]; }];Instantiate a
VoucherCreationManager:VoucherCreationManager *creationManager = [VoucherCreationManager voucherCreationManagerWithBuilder:^(VoucherCreationManagerBuilder *builder) { builder.networkManager = [[VouchrEngine instance] networkManager]; builder.wrappingPaperManager = [[VouchrEngine instance] wrappingPaperManager]; builder.userManager = [[VouchrEngine instance] userManager]; builder.voucherManager = [[VouchrEngine instance] voucherManager]; builder.fullScreenLoadingView = [[YourLoadingView alloc] initWithFrame:CGRectZero]; builder.alwaysShowFullSummaryScreen = YES; }];Instantiate a
VoucherCreationFlowCoordinator:VoucherCreationFlowCoordinator *voucherCreationFlowCoordinator = [VoucherCreationFlowCoordinator voucherCreationFlowCoordinatorWithManager:creationManager vouchrTheme:[VouchrConfig defaultVouchrTheme] delegate:self];Instantiate
PersonalizationOptions for all personalizations that will be available to the user.NSMutableArray <PersonalizationOption *> *personalizationOptions = [NSMutableArray new]; [personalizationOptions addObject:[RecipientPersonalizationOption recipientPersonalizationOptionWithBuilderBlock:^(RecipientPersonalizationOptionBuilder *builderBlock) { builder.vouchrTheme = [self yourThemeForTheRecipientScreen]; // this can be nil for now builderBlock.canChangeUnwrapDate = YES; builderBlock.canMakeItARace = YES; builderBlock.canSendToEmail = YES; builderBlock.canSendToPhoneNumber = YES; }]]; [personalizationOptions addObject:[TitlePersonalizationOption titlePersonalizationOptionWithBuilderBlock:^(TitlePersonalizationOptionBuilder *builderBlock) { }]]; [personalizationOptions addObject:[PhotoPersonalizationOption photoPersonalizationOptionWithBuilderBlock:^(PhotoPersonalizationOptionBuilder *builderBlock) { builderBlock.canAddMultiple = NO; builderBlock.canUploadPhotos = NO; builderBlock.canAddGoogleImages = YES; builderBlock.canTakePhotos = YES; builderBlock.suggestedSearchTerms = @[@"one", @"two", @"three"]; }]];Implement the
VoucherCreationFlowDelegatedelegate methods. Most are optional, these are the two that are required:- (void)voucherCreationShowPaymentOnViewController:(UIViewController *)viewController forVoucher:(Voucher *)voucher onCompletion:(void(^)(NSDictionary *paymentInfo, NSError *error))completion { // get payment info here for the voucher // MUST CALL completion block when finished completion(nil, nil); }- (void)showLoginOnViewController:(UIViewController *)viewController onCompletion:(void(^)(NSError *error))completion { // log in the user here // if a login view controller needs to be presented, present it on viewController. // MUST CALL to userManager loginWithCredentials:refreshTokenClient:onSuccess:onError before calling completion. // MUST CALL completion block when finished completion(nil); }Launch the Voucher Creation flow:
[voucherCreationFlowCoordinator startFlowOnViewController:self.selectedViewController personalizationOptions:personalizationOptions];
Login
A user can be logged into the VouchrSDK anytime after the VouchrEngine has been started up. Login is required for a user to send a gift, but is optional before that.
You can delay login up until a user tries to send a gift.
To login a user:
Implement the required method of <
VOAuthClient> (and optionally the others) in the place of your choice:- (void)userForRegistrationWithCredential:(Credential *)credential onSuccess:(void (^)(Credential *, SimpleUser *))onSuccess onError:(void (^)(NSError *))onError { // get a simple user, then call success block if (onSuccess) { onSuccess(credential, simpleUser); } // or error block if the user should not be registered // onError(error); }Create a
Credentialobject:Credential *credential = [Credential credentialWithNetworkId:<user_id> // This should always be the same for each user network:<network_name> // This should be the same for all users (unique to each client of the SDK) accessToken:<user_access_token>; // This can update as much as necessaryAlternatively, an initializer with an NSDictionary is supported:
Credential *credential = [Credential credentialWithDictionary:@{@"networkId": <user_id>, @"network": <network_name>, @"accessToken": <access_token>}];If you require sending something different than a networkId/accessToken, you can subclass
Credentialand override thedictionaryRepresentationmethod. eg:@interface GoogleCredential : Credential @property (nonatomic) NSString *userId; @property (nonatomic) NSString *token1; @property (nonatomic) NSString *token2; @end @implementation GoogleCredential // initializer goes here - (NSDictionary *)dictionaryRepresentation { return @{@"networkId": self.userId, @"network": @"google", @"token1": self.token1, @"token2": self.token2}; } @endSend the
Credentialand <VOAuthClient> to theUserManagerlogin call:[[[VouchrEngine instance] userManager] loginWithCredentials:credential authClient:<object that implements <VOAuthClient>> onSuccess:onSucceed // optional callbacks for a successful & error on login onError:onError]; // or anything after an error has occurred
If the user is not logged in when they try to send a gift, the VoucherCreationFlowDelegate will call:
- (void)showLoginOnViewController:(UIViewController *)viewController onCompletion:(void(^)(NSError *error))completion;
An example implementation is provided:
- (void)showLoginOnViewController:(UIViewController *)viewController onCompletion:(void(^)(NSError *error))completion {
    [self.facebookManager loginWithCompletion:^(NSString *userId, NSString *fbToken, NSError *error) {
        if (error) {
            completion(error);
        } else {
           Credential *credential = [Credential credentialWithNetworkId:userId
                                                                network:@"facebook"
                                                            accessToken:fbToken];
            [[[VouchrEngine instance] userManager] loginWithCredentials:credential
                                                             authClient:self.facebookManager
                                                             onSuccess:^{
                                                                           completion(nil);
                                                                       }
                                                               onError:completion];
        }
    }];
}
Customization
The VouchrSDK provides the ability to customize many things.
Global Customization
Global Customizations are done in the VouchrConfig file. See VouchrConfig for more details.
Create Flow Customization
General Create Flow Customizations are done in the VoucherCreationManager. See VoucherCreationManager for details.
Create Personalization Option Customization
Each Personalization Option (eg. Video, Photo, etc.) have specific customizations that can be provided. Each is a subclass of PersonalizationOption which has some options that all provide.
Personalization Options
Any personalization options that are included will show up in a carousel on the create screen. The user can add as many customizations as they would like.
Photo
Photos lets the user upload and take photos as well as add photos from Google Images. See PhotoPersonalizationOption for details.
Games / Challenges (Coming soon)
Challenges lets the user include a game or challenge the claimer must play before claiming their gift. See ChallengePersonalizationOption for details.
Notes
Notes lets the user include a custom message in the gift. See NotePersonalizationOption for details.
Wrapping
Wrapping lets the user set a custom wrapping paper on the envelope of their gift. See WrappingPersonalizationOption for details.
Animated
Animated lets the user attach a GIF to the gift from GIPHY. See AnimatedPersonalizationOption for details.
Title
Title lets the user include a title for the gift. This will always be at the top of the gift reveal. See TitlePersonalizationOption for details.
Recipient
Recipient lets the user include a recipient for the gift. See RecipientPersonalizationOption for details.
Video
Video lets the user include a youtube video or their own video. See VideoPersonalizationOption for details.
Merchant (Coming soon)
Merchant lets the user include a gift card or something of monetary value to the gift. See MerchantPersonalizationOption for details.
Sound (Coming soon)
Sound lets the user include a sound that will play when the claimer unwraps their gift. See SoundPersonalizationOption for details.
Theming
Theming can be set globally, or on a per ViewController basis. See VouchrTheme for details.
Starting the Receive Flow
The VoucherRevealViewController screen displays the unwrap experience and presents all the contents in the Voucher so the user can browse through them. The VoucherRevealViewController can be used to preview Vouchers during the creation phase, as is also used for the native receive experience.
This screen supports revealing of fully activated Vouchers as well as in-progress ones.
Voucher Preview
Previewing a Voucher allows senders to check out their creation, ensuring they are building what they intended.
See the Voucher Reveal section below for information. The setup is nearly identical, set the revealMode parameter to: RevealModePreview.
Voucher Reveal
The VoucherRevealViewController screen contains the unwrap experience and displays all of the contents in the Voucher. The VoucherRevealViewController can be used for previewing the voucher for voucher creation, or be used for a user to receive their Voucher.
Instantiate the
VoucherRevealManagerand use the builder block to set any needed configurations (e.g themes):VoucherRevealManager *revealManager = [VoucherRevealManager voucherRevealManagerWithBuilder:^(VoucherRevealManagerBuilder *builder) { VouchrTheme *theme = [self baseTheme]; theme.displayFontTheme.color = UIColor.blackColor; builder.revealViewControllerTheme = theme; VouchrTheme *gameViewControllerTheme = [self baseTheme]; gameViewControllerTheme.neutralActionButtonTheme.borderWidth = 2.0f; builder.gameViewControllerTheme = gameViewControllerTheme; }];Instantiate
VoucherRevealFlowCoordinatorwith the newly createdVoucherRevealManager:VoucherRevealFlowCoordinator *revealFlowCoordinator = [VoucherRevealFlowCoordinator voucherRevealFlowCoordinatorWithManager:revealManager delegate:nil];Set the
Voucherto be revealed:[revealFlowCoordinator updateCurrentVoucherWithNewVoucher:voucher];To present the
RevealViewController:[revealFlowCoordinator startFlowOnViewController:self revealMode:RevealModeDefault backgroundColor:nil];See
RevealModefor more details.