
Installation
The SDK can be installed using CocoaPods or by manually downloading and integrating the framework into the project.
CocoaPods
- The Vouchr SDK uses a private CocoaPod spec repo. To access the repo add the following lines to the top of the your project’s Podfile
# CocoaPods master repository source 'https://github.com/CocoaPods/Specs.git' # Vouchr private repository source "[email protected]:VouchrApp/VouchrSpecRepo.git" - Add the following line to the app’s target
pod 'VouchrSDK' - Run the following command in your project root directory from a terminal window
pod install
Manual Download
-
Download and unzip the latest VouchrSDK Framework
-
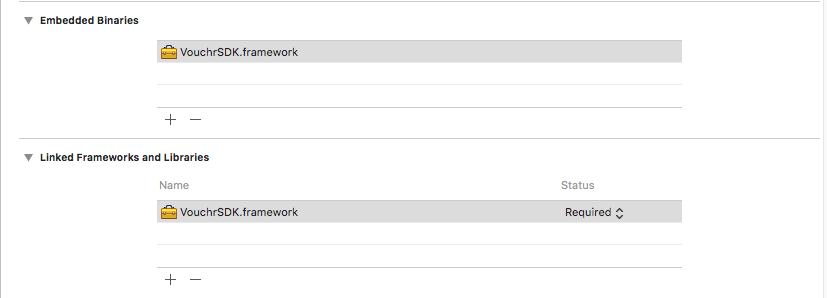
Add the Framework to your project’s Frameworks and add it as an Embedded Binary
-
Create a new Run Script Phase in your project’s target Build Phases and add the following snippet
bash "${BUILT_PRODUCTS_DIR}/${FRAMEWORKS_FOLDER_PATH}/VouchrSDK.framework/strip-frameworks.sh"
Configure Your App’s Info.plist File
- Include NSCameraUsageDescription key in your
Info.plistfile to enable device camera usage. - Include NSMicrophoneUsageDescription key in your
Info.plistfile to enable device microphone usage. - Include NSPhotoLibraryUsageDescription key in your
Info.plistfile to enable saving captured photos or videos into the user’s Photo Library.
For each key, provide a message that explains to the user why your app needs to capture media, so the user can feel confident granting permission to your app. The appropriate key must be present in your app’s Info.plist file, or else the system will terminate your app when your app requests authorization or attempts to use a capture device.
Swift Projects
If using Swift, create (if not already created) a bridging header and include #import <VouchrSDK/VouchrSDK.h>.